

Introduction:
The students will see the SWAC facility on Tetiaroa, and participate in an activity which illustrates the transfer of heat energy. Armed with new understanding, they will build, test, and explain the functioning of their model heat transfer systems.
Hot hands, Cold hands
Materials: Two large containers, water, ice cubes.
Activity prep: An hour or so before the activity, set a bowl of tap water out in the sun. (This till be the water used for the warm hands team, and reinforces the 'original energy source'.)
Procedure: Draw 3 long, parallel lines in the sand, and explain that the lines represent two water tubes. Place one water container at each end of the center line. Divide the class into 2 teams (cold and warm). Each team should put their hands into the water, and leave their hands in till they are noticeably "cold" or "warm". From opposite ends of the 'tubes', students walk toward each other, touching hands as they pass, like football teams do after playing. The length of time they touch can be varied. As the students pass each of the members of the other team, they should return to their team's water container and warm up or cool down their hands, then continue. The activity should be continuous - students are like giant water molecules, storing and releasing heat energy as they go through the tubes.
Questions:
- After touching hands all the way down the line, could you feel that your hand had cooled down/warmed up from touching the other team?
- Did you notice any changes in the temperature of the water in the containers?
- Which team had hands with more energy?
- Which team gave energy?
- Which team took energy?
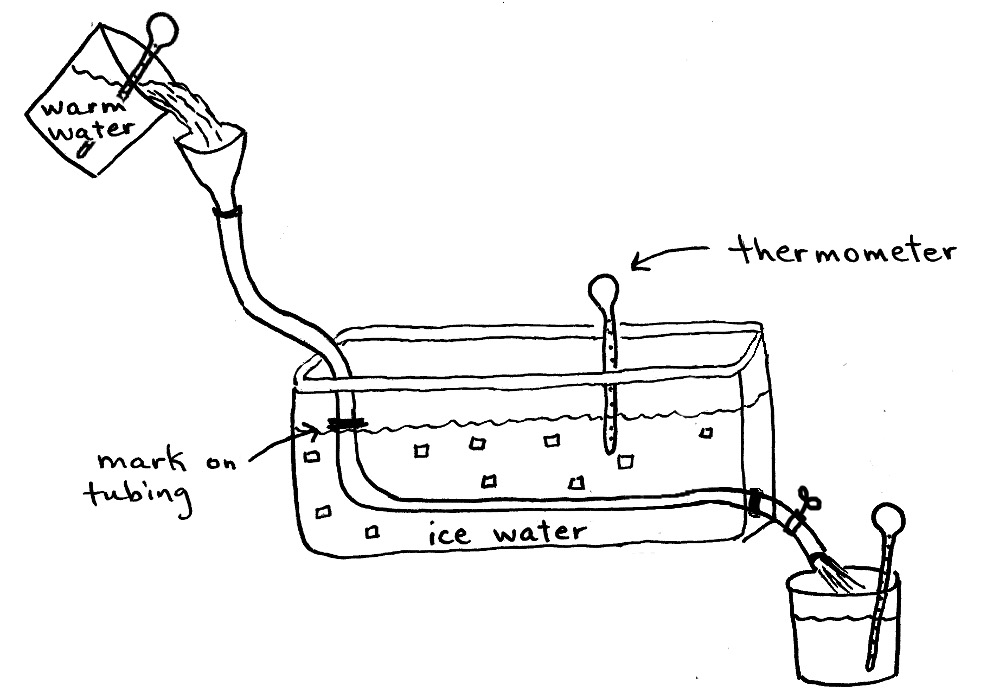
Build a heat exchanger
Students will build and test the effectiveness of a simple heat transfer system.
Objectives: students will be able to explain their system, its effectiveness at cooling water, and compare their system specifications to the specs/effectiveness of systems built by their classmates.
Materials:
- large coolers or plastic tubs (drill a hole in one end)
- silicone sealer
- copper tubing
- plastic tubing
- funnels
- buckets
- measuring tapes
- cord or tape for marking tubing
- thermometers
- ice
- data sheets for recording results
- zip ties, cords, etc, for attaching tubing (if needed)
This is a small group activity, with 3 students per group as the ideal: One student to pour, one to read the temperature of the outlet water, and one to record the data.
Following (more or less) the schema below, students will design a version of their own heat transfer system, and design a fair test for one of the following:
- the effectiveness of copper tubing vs. plastic tubing (must use the same length of each type of tubing)
- the relationship of the length of a tube on the effectiveness (must use one type of tubing in different lengths)
- the relationship of the time the water spends in the tube to effectiveness (the outlet end of the tube must be able to be blocked off and timed) If students choose a time-related investigation, they will also need timers and either a small valve, or someone assigned to stop the flow at the outlet with their finger.
- reverse system - some students may want to try heating the water, instead of cooling it.
Notes: The tubing must be marked at the chosen length, to insure that the same length of tubing is in the ice water for each trial. This length should be noted on the data sheet. Temperatures should be read for each trial, for accuracy. Background info for students should include "What constitutes a 'fair' test in scientific investigations?"
Data recording sheets for heat exchanger investigation. If students will be testing for some other variable, they will need to make their own data sheets.
If the tube length is the variable:
Water volume______________ Tube material_________________ Time in tube______________
|
trial # |
input temp |
tub water temp |
output temp |
tube length |
temp change |
|---|---|---|---|---|---|
|
|
|
|
|
|
|
|
|
|
|
|
|
|
|
|
|
|
|
|
|
|
|
|
|
|
|
|
|
|
|
|
|
|
|
If the tube material is the variable:
Water volume______________ Tube length_________________ Time in tube______________
|
trial # |
input temp |
tub water temp |
output temp |
tube material |
temp change |
|---|---|---|---|---|---|
|
|
|
|
|
|
|
|
|
|
|
|
|
|
|
|
|
|
|
|
|
|
|
|
|
|
|
|
|
|
|
|
|
|
|
If the time that the water spends in the tube is the variable:
Water volume______________ Tube material_________________ Tube length______________
|
trial # |
input temp |
tub water temp |
output temp |
time in tube |
temp change |
|---|---|---|---|---|---|
|
|
|
|
|
|
|
|
|
|
|
|
|
|
|
|
|
|
|
|
|
|
|
|
|
|
|
|
|
|
|
|
|
|
|
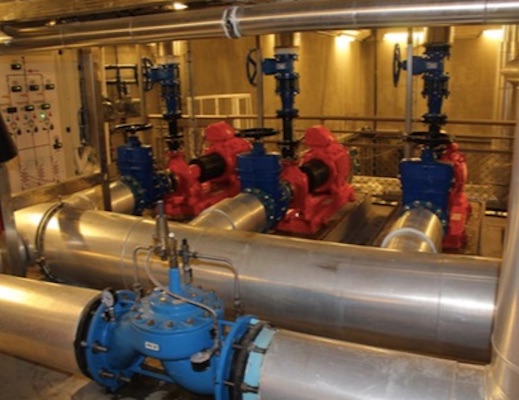
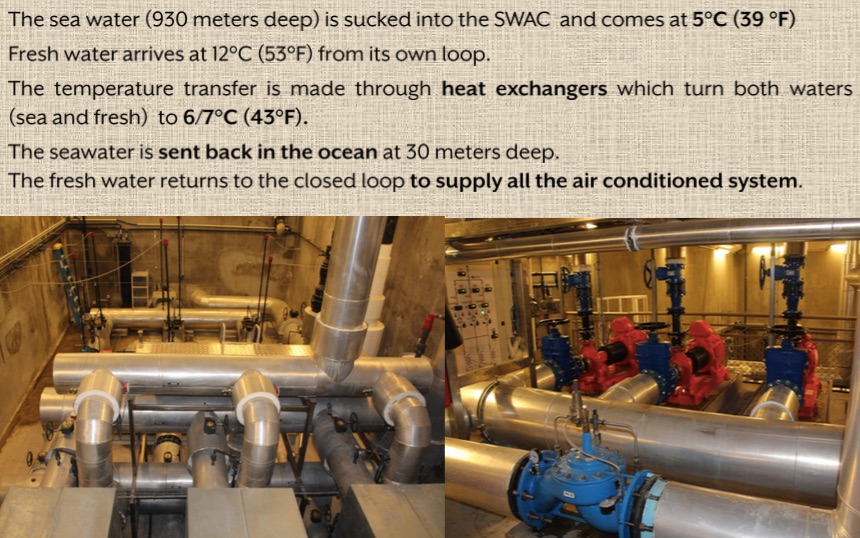
Explore the SWAC - some facts
Questions - discuss during or after the visit.
- How deep is the inlet pipe? What is the temperature of the ocean water at that depth?
- How deep in the outlet pipe? What is the temperature of the ocean water at that depth?
- What is the temperature of the water coming from the SWAC outlet pipe?
- Does the inlet water have more or less energy than the outlet water?
Onetahi